Monday, May 27, 2013

Sugar Week(s)

Superior Pastry is arguably all about the sugar work.  It is the most advanced thing we learn, and many students continue through Superior specifically to get some experience pulling sugar.  We saw a sugar demo in Intermediate (one Chef Eric gave us towards the end of the semester just for kicks), but now we were finally to the real deal.  After the chocolate bonbons, it was Sugar Time.

The sugar portion of our education comes in three parts over two weeks:  One class for pastillage and a little practice (and to get over the initial shock of the high working temperature of isomalt); one practice run of the Sugar Exam, during which we construct a Sugar Showpiece and the Chef gives critiques about the design and execution; and the Sugar Exam.

Leçon 107

For the first time, Chef Hervé gave us a straightforward list of the requirements for our Sugar Showpiece.  We had to know, because the pastillage we would make in Practical 107 would be the exact same pastillage we would use in our Sugar Exam.  He had been avoiding telling us, because he didn’t want us to get distracted while we were supposed to be working on our Chocolate Showpiece.  Lesson 107 was the pastillage demo, and it went really well.  We learned how to make it, a white fast-drying dough that can be used to build hard-as-a-rock sugar components.  It is opaque, so it adds a nice design element to our mostly-transparent Sugar Showpieces.  Chef also demoed a few different sugar flowers and the best technique for a sugar ribbon.
Chef's pulled sugar demo

A pulled sugar daisy: one of four flowers the chef
taught us how to pull
The practical was our chance to get adjusted to working with sugar.  We spent the first hour making and shaping our pastillage components.  I had spent the previous few days working on the sketch for my Sugar Showpiece, and I am so glad I brought it to class!  I made a whole tray of pastillage leaves, barnacles, ropes, fish, and lily pads…everything I thought I could possibly want on my showpiece, making sure I had at least three of everything (to account for the practice exam and possible breakage).  The rest of the class was spent cooking and working with isomalt, a sugar substitute that is slightly less susceptible to humidity.  The flowers took a lot of trial and error for me, but I finally got one decent-looking rose.  The ribbon was much easier for most of us (to the surprise of Chef Hervé), so I made a really cute, shiny sugar bow.
My tray of pastillage.  Everyone thought my lily pads were
Pac Men.  That anchor is made of compressed sugar, and it
didn't work out.  But it was worth a try!
My first successful sugar rose...I knew I needed to practice
at home before the exam

My shiny sugar bow!

Leçon 108

Chef Hervé was out of town with a few of our classmates who were competing in the Canadian Youth Skills Competition, so Chef Jocelyn gave us our Sugar Showpiece demo in Lesson 108.  He showed us all of the required elements for our exam:  a poured base, a poured main piece (shaped however we like), three flowers (including at least one rose), leaves, a ribbon, and some pastillage.  Every other technique (including the blown sugar that I was determined to do) was worth extra points.  Quite a few things went wrong in the demo (things that just happen sometimes), but Chef handled it like a pro!  He used the pastillage from Chef Hervé’s demo the previous week, and at the end of class he addressed our many questions about the practice exam that would take place in the next two days.

Chef Jocelyn's sugar showpiece
My mom was in town speaking at a conference, and she was staying with us!  It was great fun, and she graciously fielded design questions I bounced off of her about my final sketch.  I had been practicing blown and pulled sugar at home, and it was really fun to show her what I planned to do in 3D.

Practicing pulled roses at home

Practicing blown fish at home: I really wanted
one on my final piece!
Chef Hervé was back just in time for our practical class, and I couldn’t be more excited to get started!  I really believed in my design, and practicing so much at home had me determined to produce something beautiful.  Months before, I had visions of using an anchor in my sculpture, so I ultimately ended up with an underwater-themed design that included a blown sugar fish and a huge pastillage lily pad.  I made my own anchor mold out of a square sheet of silicone, and I hoped it would work out…but I wasn’t really sure it would.

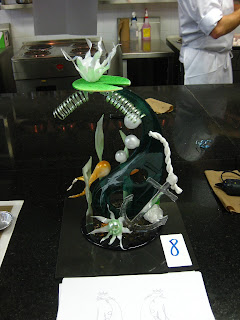
The practical was so much fun, and it went really well for me.  The main poured piece turned out much darker than I had envisioned, but it grew on me, and the anchor mold was fine.  I had plenty of time, so I worked at a cautious pace to be sure I didn’t break much.  After everyone had finished and walked their sculpture down a few stairs, through three doors and around three corners, Chef gave comments on every piece in front of the entire class.  It was good to hear everyone’s comments so clearly, and to see everyone’s different designs.  When it came to my sculpture, Chef said, “La Petite Erin...Good Job!  I like this.  Keep the colors.  Good shape.  Ribbon, very nice.  This (the flower with the green center) is beautiful!  One thing:  pull sugar a little more.  Nice work.”  I was so happy with his critique, and was excited to show Mom and Chad my work!  They had seen first-hand how nervous I was when I left for class that afternoon.
It was fun to see all the different designs we came up with
using the same materials and techniques!
Mom and Chad met me at school to pick me up and sneak a peak of my piece.  Unfortunately, we weren’t able to go inside to take a look (the building was locked), but I suspected as much, so after we had finished and everyone had left, Robyn (my classmate) and I returned to the showpieces to take nice photos of ours.  It was a successful day, and Mom and Chad had fruit salad and supper waiting for me when we got home.
My first Sugar Showpiece!! (From the front)

From the side

From the back

Leçon 109: Sugar Exam

Between the practice exam and the Sugar Exam, Chad and I went home for a week (Mom got on the same planes as us!), but that’s a different post all-together.

Since we had already seen the Sugar Showpiece demo, Chef Hervé gave us a wedding cake demonstration to accompany our sugar exam.  It was casual and fun, though many students complained that we wouldn’t be making a wedding cake in practical.  Chef even told us about a French wedding tradition in which family and friends plant a tree in the house of the newlyweds.  They put a stork or a baby on top of the tree, and if a baby comes within a year of marriage, the couple has to chop the tree down.  If they wait at least until their first anniversary, the tree gets to live.  Interesting, huh?
The French and American aesthetics are a bit
different when it comes to wedding cake,
bit it was a really fun demo
Although the practice exam had gone so well for me, I was still pretty nervous for the Sugar Exam itself.  It composes 20% of my final grade, and with sugar, things can go wrong so easily.  I made a few small changes to my sketch, mostly concerning the scale, and I practiced a little more at home.

Regardless of my nerves, the practical went really well.  I took my time again, being sure to make extras of my flowers and bubbles and fish, and it was actually kind of leisurely.  Chef Jocelyn was in the practical, and he often stopped at my station and complimented my tiny fan (I brought it from home to help with my sugar blowing), my spirals, and my flowers.  Chef Hervé stopped at my station and complimented my work now and then, too, which was great encouragement.

When it was finished, I was so proud!  The colors were different from the first time (as Chef warned us they would be), but it was nice.  We didn’t get comments this time, but I am confident that I did a good job.  My little anchor worked out, and I know I’ll continue to do sugar work in the future, even if it’s just in my leisure.
We get graded on how much our sculpture
resembles our sketch.  I think mine look pretty
close!  (sorry it's sideways...not sure how to fix that)

Chef Jocelyn really liked this flower


Success!

The back

Sunday, April 28, 2013

Chocolate Week


We kicked off this week with fruit carving with Chef Armando on Monday, and Chef Hervé referred to the rest of it as “Chocolate Week.”  He had a good reason: Tuesday and Wednesday we would be learning then tackling the Chocolate Showpiece, then Thursday and Friday we would be doing our first molded Chocolate Bonbons, which are guaranteed to be on the final exam in June. 

This is what happens if you melt pure chocolate, then let it
set without tempering.  It hasn't gone bad, the lighter swirls
are just the cocoa butter that has separated from the cocoa
paste.  It can be fixed by tempering (this photo is of the little
box of chocolate I have in the cupboard to practice with).
Chocolate works on its own terms.  It does what it wants when it wants, and if we can even hope to manipulate it, we have to follow its set of exact and demanding rules.  Maybe it seems like I am making it sound harder than it is.  How complicated could it be, right?  Melt the chocolate, mold the chocolate, un-mold the chocolate, and it’s done, right?  Not quite.  In order to work with real, pure chocolate (without artificial fillers or oils), it has to be tempered; a process that breaks down the chocolate molecules, then re-crystalizes them in a stronger, shinier way.  Without this process, it never sets and it sticks to molds.  It gets soft at room temperature.  It looks swirled and dull (ever left a candy bar in a hot car, then put it in the fridge?).  At home, we have a lot of products that are designed to circumvent tempering, but they aren’t chocolate.  They are chocolate-flavored candy that is full of oil and emulsifiers that help them set and remain hard simply by melting and allowing to cool.

Anyway: I usually have pretty good luck working with chocolate, but even so, I was still a little nervous going in to the showpiece lesson.

Chocolate Showpiece

Chef Hervé approached this like any other lesson.  It was, after all.  In two and a half hours, he constructed a beautiful sculpture made entirely of chocolate.  While he worked, he explained what elements would be required for us:  A chocolate base that looks like granite, a large molded piece, a tall hollow cylinder as a support, a chocolate flower, chocolate leaves, and two “other techniques” (options: molded spheres, thin curved pieces, piped pieces, “coral,” or “straws).   Each element would be easy to make; the hard part would be balancing the design and keeping the chocolate tempered throughout our five-hour class so that it could be used as a glue when we finally assembled the sculpture.  The Chef used between three and four kilograms of chocolate, and said that we would each be given five kilos of dark chocolate and as much white chocolate as we wanted to complete our piece.
Chef's HUGE chocolate flower!  It's so big!

His showpiece from the front

We were required to come with a sketch, so I drew three and chose the best one.  I woke up an hour before the alarm on the morning of my practical, so I made a digitized version with color.  I was nervous that my showpiece would fall over.

I was prepared for the practical, but still nervous.  I didn’t have any trouble, really, until it came time to assemble my sculpture.  The first piece I glued into place, the large molded teardrop piece, was leaning badly backward, and it was too late to fix it.  Because of this, I had to place the flower flush against the piece (rather than tilted slightly forward as I had planned).  Chef Hervé suggested that I stick a scrap from my leaves, a tall, attractive red-colored white chocolate piece, right in the front.  I did it, then realized that he was probably joking, but again, it was too late to remove it.  I also had a little less chocolate left than I had hoped, so it became difficult for me to glue things toward the end.

All in all, though, I was satisfied with my showpiece.  It looked close to my sketch, and it was stable for the time being.  After it was finished, I was to walk it through a door, down three steps, around a corner, through another door, and place it on to a table.  I felt like I was on Food Network Challenge!  Nothing broke, and the showpiece lesson was officially over.
My showpiece from the front.  You can see my
digitized sketch hanging on the paper above it.

My flower -- not bad for a first try!

From the back.  I was inspired by tree fungus...
does it show?

Whew!  Successfully moved from the practical kitchen to the table.

Ta-daa!
It was a wonder than all the pieces fit on the two tables they designated for us!  When it was all over, 23 of us each made a chocolate showpiece with approximately four kilograms of chocolate.  Wow!
23 showpieces!  Our display made the hallway smell amazing.

Chocolate Bonbons

After tempering five kilos of chocolate for the showpiece, bonbons seemed like they would be a piece of cake.  Chef Hervé demonstrated seven different types to us:  Nougat (a chewy, thick honey base dotted with assorted nuts), Cinnamon and Pistachio Bonbons (white chocolate shells filled with a soft white chocolate, pistachio, and cinnamon ganache), Chocolate Caramel (caramels flavored with dark chocolate), Dipped Marzipan (thick almond paste dipped in dark chocolate), Praliné (dark chocolate shells filled with a hazelnut praline and bits of crispy, dried crêpes), Palets Or Café (coffee-flavored dark chocolate ganache dipped in dark chocolate and colored with gold dust – “Or” is “Gold” in French), and Tea Truffles (dark chocolate shells filled with a chocolate and tea ganache).  We learned the technique behind molding perfect, bubble-less shells, filling, and closing them. 
Chef's shiny Palets Or

He taught us how to color our molds.  These are the pistachio
bonbons...appropriately green!

Chef's Nougat...it's like a thick, sticky marshmallow with nuts

On the top:  Dipped Marzipan.  On the bottom: Tea Truffles
It is encouraging to see that even the Chef gets some small
bubbles in his mold sometimes

Chef's Pralines.  I didn't like the log mold initially...but tie design
has grown on me.

For the practical, we were to make five candies in five hours: the Cinnamon and Pistachio Bonbons, Chocolate Caramel, Dipped Marzipan, Praliné, and Palets Or.  The practical went well for me, overall.  The Chocolate Caramel was the most difficult, technically, and I nailed it.  My white chocolate shells are a bit too thick, but the dark chocolate ones are “perfect for the exam,” as Chef Hervé pointed out.  The dipping on my Palets Or was too thick, too, but Chef really liked my marzipans.  Everything was consistently sized, a major goal of mine for the lesson, so I was pretty excited about that.  I tried to paint a little design into the molds for the pistachio bonbons, but a lot of the color stuck, so they didn’t all turn out attractively…but my log-shaped Pralinés look really nice.  At the end of the five hours, I had between 165 and 175 candies to take home.
My Pistachio Bonbons (left) and Pralines (right)
It's a shame that my color didn't really work out
for the pistachio ones.

My Palets Or

My Dipped Marzipans (left) and Chocolate Caramels (right)
A+ for size and shape consistency!

My little Praline logs (the tastiest kind!)

What I presented for the practical. 
I left with SO many candies!  Well over 100 of them.

I inadvertently made my marzipans look like a little guy in a hat...
Quinn named him "Marzi-man." 

From left:  too thick, too thick, PERFECT!
After the practical, Chad picked Quinn and me up at school with the car because we were allowed to take our chocolate showpieces home.  The car definitely helped…I’m not sure I could have walked the thing home.  When it was safely on our counter (missing a couple pieces from the ride), Chad was a great sport in helping me take photos of it.  It’s a good thing we did!  This morning while we were still sleeping, the direct sunlight found the showpiece and pretty well destroyed it.  First it fell over, then the pieces facing the sun caved in and drooped over.  I’m glad it happened – now it will be easier for me to melt it down and use the chocolate for practice!

From Every Angle

The base really did look like granite!

The leaves were really shiny, and had some texture from the
veins I carved into the chocolate

Missing a few pieces, with my bonbons on the
base

No, the photo isn't crooked...that's definitely
the showpiece.  See how the white chocolate
piece in the front is getting floppy?  THAT
is why it was a joke when Chef suggested
that I put it there.  White chocolate is not
very resistant to heat.

From the back

So many finger prints!  Definitely one of the top
things I need to improve for the next time.

From the right side

Now we can eat it!  (Just kidding - I'm going to separate the dark
from the white chocolate and melt it down to have it here for
practicing) 
Whoops!

Fruit Carving with Chef Armando


Throughout Superior Pastry, we have two classes with Chef Armando Baisas, a fabulously talented chef who is so world-renown for his ice carving that he usually is asked to judge competitions, rather than compete in them.  (He has been recognized by two national governments for his achievements in the art!)  The two classes we have with him teach us fruit carving and “ice carving,” which my class will do with humongous blocks of lard, since it will likely take place at the end of May (and even in Canada, it isn’t cold enough to carve ice that late).  This past week, we were lucky enough to have our fruit carving class, and I was SO excited!

Chef Armando hard at work on a honeydew melon basket
Class was on Monday, and my friends and I arrived even earlier than usual.  Chef Armando is a pretty laid-back, quiet guy, so he let us in the classroom and tamely did a roll call while we waited for the last few students.  He had a huge industrial-grade tool box on the counter, and another Tupperware container full of small chisels.  I recognized the carving tools:  Justin Willmert and I used almost the exact same ones to carve stamps in high school Art class.

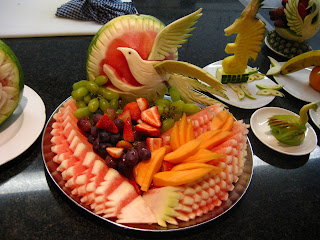
Once everyone was in attendance, Chef Armando began the class by explaining his tools and a few basic techniques.  He started by showing us some fruit and vegetable sculptures that are mostly made by attaching different pieces together and merely accented by a little simple carving.  He made a funny little bird’s head, a palm tree, and a dolphin out of a banana and a grapefruit.  He progressively introduced more carving with each piece, moving to a swan, turtle, and butterflies made from green apples, then an ingenious way to carve a quarter pineapple so that it becomes a pineapple-serving vessel.  He carved the core of a pineapple into a seahorse that stands on its own!  He then moved to melons, carving a (kind of scary) rat from a cantaloupe, a basket and a swan from honeydews, and beautiful flowers and a bird from half-watermelons.  Watching him work was captivating; it seemed effortless, but it was just so lovely.  He often commented that we were being too quiet, but really I think that we were all impressed.
Only about a third of what Chef Armando made!

Just grab a slice of pineapple and go!  Way faster than cutting
it the conventional way, prettier, and smarter.

Honeydew basket filled with melon and grapes

Now THAT is a fruit salad!

Granny Smith the swan

This seahorse is made from the core of a pineapple,
and he can stand on his own.  Impressive!  The butterflies
are each made from an apple slice

Granny Smith the turtle

A swan made from a honeydew that doubles
as a fruit basket: pretty and functional!

This funny little bird is the first thing he showed us

His eyes are made of peppercorns

This is what I was looking forward to!  I have seen
so many of these beautiful watermelons on cruise ship
buffet lines, and I was sure he would teach us how
it is done.

Some people think he's a rat, some people think he's
a koala, Alyson thinks he's Stitch...I just think he's
a little freaky

Our practical was right after the demo, and this time we had three hours rather than our usual five.  We loaded boxes and boxes full of fruit into the room (enough for our section and the next), then began to work.  Chef Armando encouraged us to try to reproduce his work, and said that we had to take home everything we cut in to.  We were each allowed one honeydew, one cantaloupe, half a watermelon, one pineapple, and an unlimited supply of oranges, grapefruits, bananas, carrots, zucchinis, grapes, strawberries, and apples. 

I had some trouble right away, and when I asked the Chef to lend me a hand he rolled his eyes at my carving tools (fresh from the boutique downstairs) and took them to sharpen them.  Evidently the factory doesn’t like them as sharp as he does.  As soon as he returned, it was a lot easier, but definitely nothing like he made it look!  I started with the palm tree, which turned out well, then worked my way through the apples, melons, watermelon, and finally the pineapple.  It was so fun, and at the end, Chef Armando said that I “definitely have potential, but [I] need to practice.”  I think I will practice: fruit carving would be welcomed in my future.
Concentrating on my watermelon.  Thanks again to Quinn for
taking an artsy action photo!

My watermelon!  Not perfect, but pretty good for
a first try!  As soon as watermelon is in the grocery
store again, this will probably be a pretty common
sight around our apartment.

Honeydew swan!

I'm glad I got this one figured out -- I'll never cut a pineapple the
conventional way again!

Apple swan with a strawberry rose and the base of my palm tree

My work from the practical.  You can imagine the fruit salad
that came from it!

My palm tree.  He is now in a fabulous vegetable
soup that I made to use up the carrot.

Chef also made this melon basket in the demo as
a good way to use up the other half of the melon
that is used as the "leaves" of the palm tree.

Quinn and I were the only two in the class who used our honeydew
melons to try the swan!

Chef Armando and me.  And my palm tree.
I felt like Lady Liberty.

As required, I carried all of my fruit home (in two large bags that I brought to class).  I cut them up and made a huge fruit salad, but it tasted so great that Chad and I had it cleaned out in a few days.

To experience Chef Armando carving fruits and vegetables, click here.  It's a short video shot in our class room by Health Check, part of the Canadian Heart and Stroke Foundation.